I haven't written much lately because of holiday prep, travel, and computer issues. Right before we left town I was madly turning out coasters -- first for the guild's mug rug challenge and then for family stocking stuffers.
By the way, the guild members made close to 200 mug rugs for nurses at the county medical center and hospice house.
I think I made 8 for the nurses and, while I was in high gear, I kept whipping them out for the family. So easy that I thought my loyal readers might appreciate a tutorial. Unfortunately, I don't remember the source for this pattern. But here goes:
- Start with five 5" fabric squares. It's fun to pick a theme and use at least two different fabrics on the "pretty" side.
- Select one square to be the "bottom" of the coaster. Fold and press the other four fabric squares into right triangles.
- Cut a batting square at 4-3/4".
- Center batting square on the wrong side of the "bottom" square and press to make it stick (just hand-rubbing works).

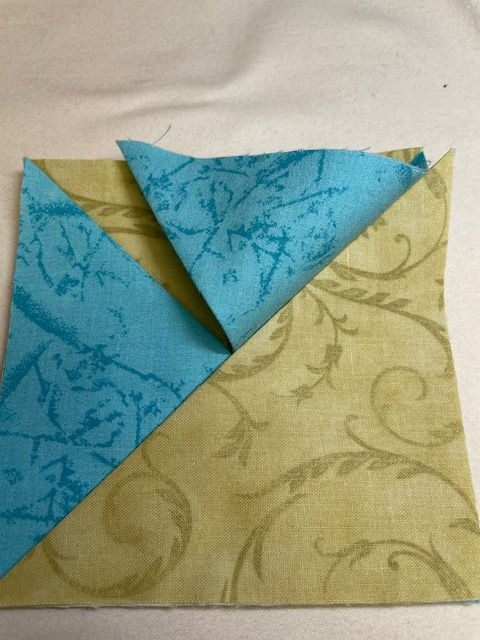
Turn that bottom square (with the batting stuck to it) right side up and place one of the triangles in the upper right corner

The 2nd triangle goes in the upper left corner, overlapping the first triangle

The 3rd triangle goes in the lower left corner, again overlapping the earlier triangles.

The 4th triangle is a bit tricky. I bet you already figured out it goes in the lower right corner.

Initially that 4th triangle will overlap the others but you will need to gently raise the first triangle and tuck the 4th triangle under it.

I have found it helpful to pin each edge before stitching 1/4" around all sides of the coaster. (If you don't catch all of the batting in your stitching, it should be OK.)
Trim the corners.

Then the fun begins! Turn everything inside out. Be patient. You'll probably need to poke the corners out.

Obviously this is a different coaster than the other pictures, but you get the idea. And, voila!

This is a great use for your batting cut-offs and a fun way to use charm squares and scraps.
Those look like fun! And a great way to use up some charm squares, too. I might have to try that!
ReplyDeleteGreat tutorial Libby and they look great! Thank you and Happy New Year!
ReplyDeleteYou made a lot of fun ones. Thank you for the tutorial. Hope you are back to regular blogging soon.
ReplyDeleteWhat a great tutorial, plus it turns out so cute - thanks!
ReplyDeleteAs I type this my coffee mug is atop one of those triangle coasters. Such a clever technique.
ReplyDeleteThanks for sharing, Libby! I'm not sure I've ever made one of those coasters. I guess it's time to give it a try!
ReplyDelete