Saturday, September 17, 2016

I Like Rose, But ...

Tragedy Averted

Last week, during my severe ADD episode, my attention was diverted to some 45-degree diamonds that I thought would work nicely in a minimalist setting.


I know, the photo is not the greatest, but I felt like the jewel tones could benefit from a dash of brighter color. So I looked in my solids drawer and came across some hand-dyed fat 8ths that I think I bought for my Hunter Star quilt (I'll have to go to the laptop to get a photo of that quilt).

While steam pressing the fat 8ths I noticed this on my NEW ironing board cover.


Hmm, did I spill some wine? Or did one of the fabrics bleed?  Time to do some scientific research!


Uh, yes, the fabric bled!  What bugs me is that I had washed all of these bits once.

Good thing I discovered this before putting those fabrics in the quilt. Tragedy averted, so far! But now I have to go look at Hunters Star and see if I actually used any it that one because it hasn't been washed.

Cross your fingers !!!

Linking up with Angela for Scrap Happy Saturday.

Friday, September 16, 2016

Please Adopt Me, Two!


UPDATE:  Auction is closed. Winner has been notified.

Cynthia Brunz over at Quilting is More Fun than Housework is hosting an Orphan Adoption event this weekend. She does this twice a year. Go check it out and then find someone's UFO to adopt!

Bright Beginings

My second orphan adoption is a 24" by WOF panel of bright florals.

Bright Beginnings by Quilt Country
Sara Tuttle & Sandy Brawner for Moda
I can't tell you how long I've had this panel, probably at least 6 years.  There are 10 different arrangements of the flowers.


They resemble Jacobean applique in bright colors. They're all different sizes and shapes, too.


So it would be nice to know how to use them, right? I have the answer!!


The included pattern, "Bright Beginnings" by Quilt Country (www.quiltcountry.com), is designed to be used with the panel by the same name. How cool is that!  All you have to do is frame the little panels, then add some log cabins and 2-1/2" squares from your own bright stash. The quilt as designed finishes at 74" x 88".


There is no charge for you to adopt my orphan and I have no preference how you use what you receive. I will pay the shipping. I am located in Tennessee/USA and will only ship within the US.

This adoption is open until midnight CDT on Wednesday, September 21, 2016.

Leave a comment below and tell me what you have in mind. I'll put your name in the hat. The winner will be selected totally at random. Just be sure that there is a way I can get in touch with you to get your snail mail address (in other words, if you're a "no reply" commenter, include a current email address).

And don't forget to check out the other orphans up for adoption.

I would love to see your finished project and it would be nice if you come back here from time to time to see what I'm up to.


Please Adopt Me!

Jubilee

UPDATE:  Auction is closed. Winner has been notified.

Cynthia Brunz over at Quilting is More Fun than Housework is hosting an Orphan Adoption event this weekend. She does this twice a year. Go check it out and then find someone's UFO to adopt!

My first project up for adoption, begun in December 2013, is made from a Moda Layer Cake (Aspen Frost) and white BasicGrey Grunge by Moda.  I finished the blocks in March of this year.  All that is left for you to do is add sashing and borders of your choice! Finished size is 62" by 74".


If you adopt my UFO, you will receive 20 blocks that will finish at 10-1/2" -- 7 assorted red, 7 assorted aqua ...


and 6 assorted evergreen.


I will include two unused pieces ...


... along with the pattern ...

Jubilee by Margot Languedoc for The Pattern Basket
and the selvage from the Grunge I was using in case you want to follow the patterns and use it for sashing and borders.

There is no charge for you to adopt my orphan and I have no preference how you use what you receive. I will pay the shipping. I am located in Tennessee/USA and will only ship within the US.

This adoption is open until midnight CDT on Wednesday, September 21, 2016.

Leave a comment below and tell me what you have in mind. I'll put your name in the hat with the hoards of others who are looking for an easy finish. The winner will be selected totally at random. Just be sure that there is a way I can get in touch with you to get your snail mail address (in other words, if you're a "no reply" commenter, include a current email address).

And don't forget to check out the other orphans up for adoption.

I would love to see your finished project and it would be nice if you come back here from time to time to see what I'm up to.


Thursday, September 15, 2016

Throwback Thursday

Gwennie's House

"Gwennie" is Gwen Marston. For almost a quarter century she has been known in the quilting world for "liberated quilt making." In other words, she was doing improv when improv wasn't cool.  I have to say that of all the well-known quilters of the day, Gwen was one of the most influential to me. (Some day I plan to write about all the quilters who inspired me early on ...)

I took a "Liberated" class with Gwen at the Indiana Heritage Quilt Show in Bloomington (the same year I discovered Sara Nephew and became enamored with 60-degree angles).  In Gwen's class I made liberated/wonky stars and this liberated house:


I don't remember if I added the cheater squares at that time or later.

Lori at Humble Quilts and 4 of her friends are collaborating on "Gwennie Inspired Medallions."  I have enjoyed following the monthly progress of those working on their medallions, and I got to thinking about the medallion I made after taking Gwen's medallion workshop at her Beaver Island Retreat.


Gwen's House
I lopped off those on-point squares without hesitation -- not sure if I could bring myself to do that now. Guess I need to lose the tight pants, huh?


Monday, September 12, 2016

Down the Rabbit Hole

Another Case of QADD

Please tell me I'm not the only one with Quilter's ADD!
Here's the route I have taken down the rabbit hole over the last week:

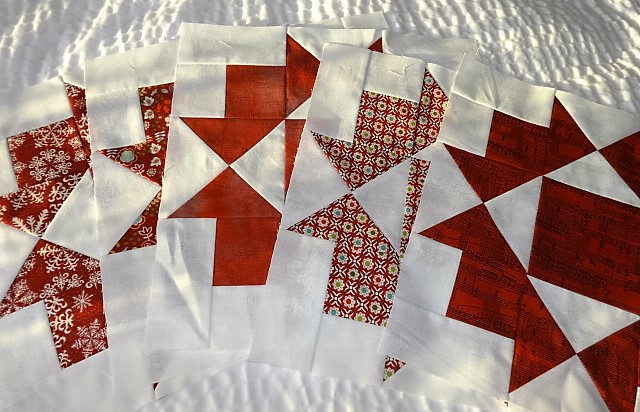
1.  Survey UFOs for potential One Monthly Goal.  I chose one and made quick progress on Star Gazing.

Star Gazing
2.  Put second UFO on design wall.  With my quick success on project 1, I put the blocks for Jubilee up where I could start thinking about the next step.

Jubilee
I felt the white grunge background was boring and couldn't find another suitable sashing fabric.  No, let me amend that -- I didn't like the blocks well enough to put the effort into finding something. (Also, last two borders are still not on Project 1!)

3. Put unloved blocks in the "Adopt Me" bin.  So I decided to put those twenty 11" blocks up for adoption when the Orphan Adoption Event begins later this week.


Oh, wait! What's this? A sandwich bag filled with jewel-tone 45-degree diamonds that I cut for Hunter's Star about 10 years ago.

4.  Design modern/minimalist quilt using diamonds.  Wouldn't those diamonds look nice set in a solid gray background? Surely my experience with 60-degree diamonds can be translated to 45-degrees ... I wonder what it would look like ... hmmm, I don't have the right shade of gray ...


5.  Drive to fabric store.  Four yards of Kona Silver should do the trick!  Got a good start on the diamonds -- some on the side, some on the point -- but I ask myself, How to arrange them? Should I have an organized pattern? Should I have an organized color scheme?

Diamond Dew Drops
6. Step across to husband's side of the studio to get a better perspective.  Say, wonder what's in that box labeled "9-Patch Bonanza." It's the leftovers from Cbex Mix which was made from leftover 9-patches from Wink & a Smile (still unfinished, by the way).

7. Finish making 31 more 9-patches.  Why not? The box was open, the strips and squares were there, it won't take much time ...


In the end I couldn't decide on a setting so it went back into the stack of boxes.  Gosh, I really should do something about this mess he has to look at all the time ...

Projects on the hearth -- why not?
So I reorganized this area.

8. Inventory all UFOs.  In keeping with my recent pledge to leave myself more notes, I decided to look in every project box to see what needed to be done. I know! I'll make a spreadsheet where I can prioritize UFOs based on the amount of effort needed to complete ....

This all transpired over the course of a week and the last two borders are still not on Star Gazing!

It's been a busy and eclectic design wall lately so I'll link up with Judy at Patchwork Times for Design Wall Monday.


Wednesday, September 7, 2016

September Goal

Making it easy on myself

Since I am already 90% finished, I hereby declare my official One Monthly Goal (OMG) for September is to completely finish this flimsy.

Star Gazing
Note all the Rainbow Scrap Challenge rosy reds!  All it lacks is top and bottom borders.  Is that cheating? Nah!

Unofficially, I plan to finish adding inner and outer borders to Trellis Garden (last month's alternate OMG) ...

Trellis Garden
I had one more thing I was thinking about working on, but decided it wasn't worth the effort and so those blocks will go into the next Orphan Adoption event (coming up soon, if I remember correctly).  Keep your eye on this blog if you are interested in twenty 11" blocks!

I'm checking in with Heidi at Red Letter Quilts. Hop over there and see what other OMGs  are on the table this month.


Monday, September 5, 2016

DWM - Note to Self

Make More Notes to Self!

Here's what was on my design wall this morning.

Star Gazing
I started this in December 2013. I completed all the blocks in March of this year.  When I pulled it back out of the box last week, I made the assumption that the blocks had been squared down to 15-1/2". Should have made a note to myself.

The pattern said the horizontal sashing should measure 51-1/2". I learned a long time ago to not cut to the pattern measurement, but put a pin where the end should be.


The first row of blocks came out to 52". However, instead of stitching that sashing on, I worked on the next row of blocks which measured 51-1/2", as did the next two rows. After a little adjusting of seam lines (and losing a few points) I whittled that first row down to size. SO glad I hadn't stitched the sashing on without checking the others! And SO put out with myself that I had not left myself any notes.

Flange made
By the end of the day I had put a tiny flange on all four sides. And began attaching the border.

Pink flange, teal border
This should be an easy finish tomorrow (flimsy).

Linking up with Patchwork Times for Design Wall Monday.