Thursday, October 8, 2015

TBT - Strippy 4-Patch

I came to quilting by way of living history -- that's where you put on funny clothes and pretend to be someone from another time and place.

Nashville Refugee Aid Camp
Battle of Nashville Reenactment - Rippavilla 1993
That's me in front, next to the lady with the chicken -- oh, that's a story for another day ....

Anyway, I thought piecing quilts would be an appropriate activity for someone of my age and station in life (in the 1860s), so this is what I started on.

Strippy 4-Patch - McCall's Quilting
I purchased this kit at my very first Paducah AQS Quilt Show. I think it was one of a series of kits put out by McCalls to support breast cancer research.

I didn't have a clue about 1/4" seams. And I recall hand stitching some of these 4-patches in a darkened lecture room at a Civil War civilian conference.  Needless to say, they were all over the size spectrum!  When it came time to assemble this I went to the sewing machine hoping the trimmed squares wouldn't fall apart before I could get them stitched to the setting triangles.

I added a few fabrics from my small stash (at the time it WAS small) to make the quilt a bit larger than the kit which meant I also had to get more light fabric for the setting triangles.

It may have been my first purchase, but not my first finish. It was also my first UFO for several years.  It began my lasting love of strippy quilts.

Linking up with Krista Quilts for Throwback Thursday.

Wednesday, October 7, 2015

A-Camping I Will Go ...

With a brief stop along the way!

Each year Peg Bingham hosts a Fall Quilt Camp at Cedar Lakes in Ripley, WV.  I was honored to be asked to teach two classes again this year.

Monday-Tuesday I'll be teaching the Exploding Pineapple (Karin Hellaby design).

Black and Tan Pineapple by Libby Smith 2014
Wednesday-Thursday it will be French Braid (Jane Hardy Miller design).

Fire and Ice by Libby Smith 2014
I like the fact that classes are two days -- some are even four days.  It allows time to really accomplish something and, from the teacher's perspective, more time for in-depth instruction.  Cedar Lakes is a lovely site in the hills of north-central West Virginia.

And there's a 2-day camp in the Spring where I'll be teaching Disappearing Dresdens (Susan Cleveland design).  I'd love to see some of you there, whether in my class or one of the others.

Delightful Dresdens by Libby Smith 2015
My Main Man and I will be making a stop in Kingsport, TN for a couple days of R&R.  A rare and treasured time, indeed.  SIL will be holding the fort here on the hill and keeping an eye on the Queen Mother in our absence.

Silver Cloud packed and ready
That's two bags of golf clubs packed in between all my teaching supplies.  Bonnie has Shamu; I have the Silver Cloud!  Tanked up and ready to rumble!


Monday, October 5, 2015

Class Preparation

... Steppin' Out

Fire and Ice by Libby Smith 2014
That's what teachers call their little demo boards -- Step-Outs.  (Hey, I didn't come up with that term, OK?)


One of the classes I am teaching at Fall Quilt Camp next week is French Braid from the original book by Jane Hardy Miller.  There is essentially one basic construction method covered in the book, but there are so many variations to that theme. I've encouraged everyone in my small class to choose one of the 14 projects in the book that matches their confidence level.  I'm hoping we will have a variety of projects underway so that we can learn the options by observing each other.


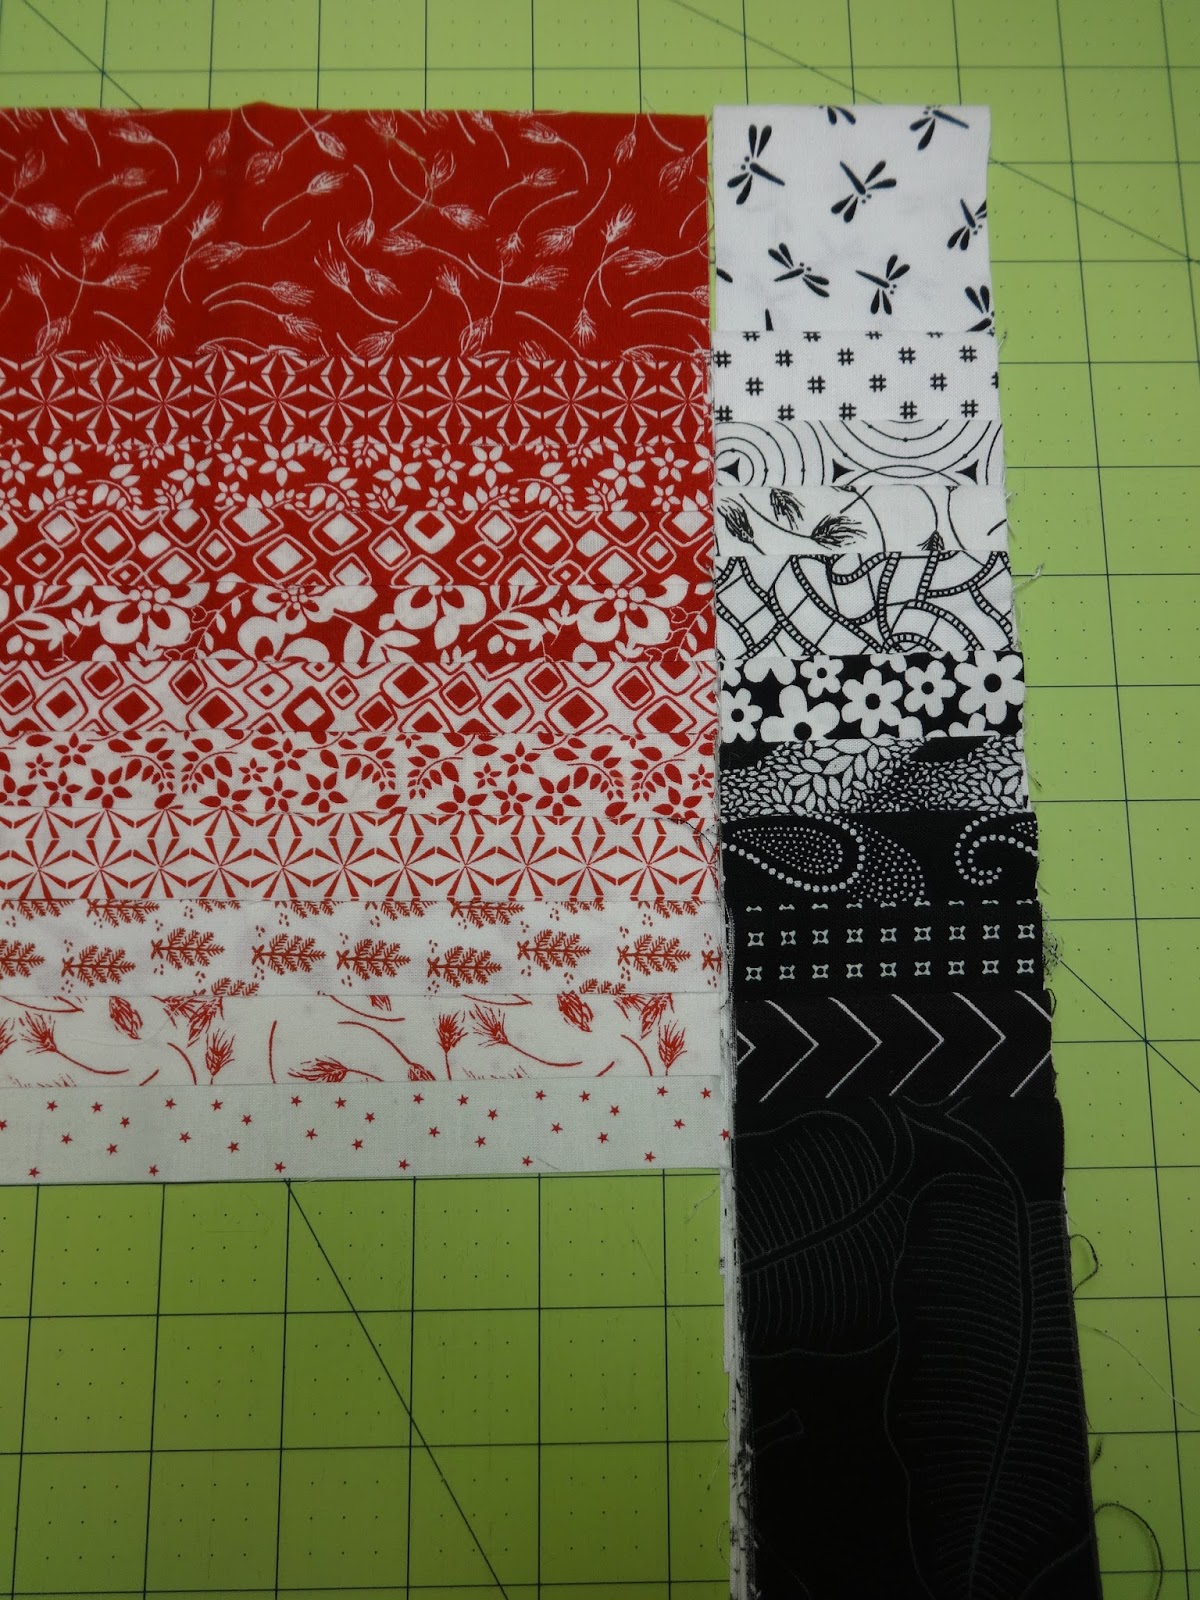
But I digress .... I started a new project in order to be able to demonstrate the steps along the way.  I am using "Big Red" from the book as my inspiration.


First order of business:  choose 10-12 fabrics for the braid run and organize into a pleasing arrangement.  My fabrics are red-on-white and white-on-red.  Working with 11 fabrics, I did my best to arrange them according to density of color on color.


This project is complicated by having black and white accent squares arranged in reverse order of value.


Divide strips into two identical piles -- left side and right side.  Add accent strips to the right side pile.


After cutting into 2-1/2" chunks, begin braid construction on a base triangle.  You'll note that the "Big Red" pattern is constructed from the center out.  My plan is to have one braid center out and two going from end in.  That way I can demonstrate both methods of construction.


One half braid made and I'm thinking of taking out a couple of the white-on-red pieces as it looks a little muddy.  I've got time to make that decision ...

Right now it's back to organizing the step-outs, typing my outline, making sure I have everything packed for this class, making sure I have everything packed for the Exploding Pineapple class, making sure I have everything packed for 3 days of R&R (including golf) with my husband .... well, you know how it goes.

So this is what's on my design wall today.  Hop over to Patchwork Times to see what others are working on.


Sunday, October 4, 2015

Sunday Stash Report

A Finish -- whoo hoo!

Trip to Melbourne a/k/a Spare Change
I managed to finish Trip to Melbourne but it has been too overcast to get a better picture of it.  Maybe later today ....

The good news:  6 yards out!

Weekly Stash Report -October 4, 2015
     In last two weeks:              0.00 yards
     Out last week:                    6.00 yards
     In year to Date:               179.50 yards
     Out Year-to-Date:           163.75 yards
     Net Used                           15.75 yards

Still a bit in the hole, but not bad, all things considered.

Linking up with Patchwork Times.

Wednesday, September 30, 2015

TBT Shoofly - Part Deux

.. the rest of the story

Revisiting some of my oldest quilts has been personally enlightening
and, before I forget it, I want to thank
Krista at Krista Quilts for hosting her version of Throwback Thursday.

Shoofly on Steroids


For some finished quilts there is a back story -- er, I mean a story about the back.  Such is the case with "Shoofly on Steroids" that I reviewed last week.


Again, I was a new quilter, watching every daily rerun of Simply Quilts, absorbing every new idea thrown my way.  (Oh wait, as a new quilter every idea was new!)  Somewhere I heard or read the suggestion to use up excess fabric on the back.

I took this to heart:

Original Shoofly Back
(I had to drape it around the end of my fabric shelves to get a halfway decent shot.)

In the end I replaced it with a single fabric because I was too embarrassed to put such a mess on the back of my "masterpiece."  I had even gone to the effort of basting the quilt before I realized that actually quilting the sandwich was WAY beyond my abilities at that point (still is!) -- plus it needed to be done by Christmas -- so I unbasted and went to Plan B.  Not wanting to waste such large cuts of fabric, I folded it up and buried it on the shelf where it still resides.

I suppose in today's environment it would be considered a very modern top!  What goes around, comes around.

Linking up with Krista for Throwback Thursday.


Monday, September 28, 2015

Counting Down

... in More Ways Than One

Less than two week till Peg Bingham's Fall Quilt Camp in Ripley, WV!

Before I go full-steam into class preparations, I need to clear some things off my sewing table.  To justify, these projects are ones I plan to show in the Teacher Spotlight as potential future classes.

This first project I am calling "Trip to Melbourne" because a gifted pack of 10-inch squares of Benartex Melbourne was the starting point.

Trip to Melbourne a/k/a Spare Change
I added fabrics from my stash to make this a large twin.  The pattern is "Spare Change" from the book Loose Change by Kansas Troubles Quilters.  All the patterns are very easy, using precut squares.

This second project I'm calling "Gray Side of the Moon" because I seem to be in my "gray phase" of fabric love.

Gray Side of the Moon a/k/a Top-Notch Diamonds
 The pattern is "Top-Notch Diamonds" from the October 2015 edition of  American Patchwork & Quilting.  (Sorry, the lighter gray diamonds blend into the flannel-back tablecloth design wall.)  I've been using strips I had previously cut for a failed project.  The pattern calls for trimming the diamonds to square up the quilt but I can't bear to waste that much effort. Instead, I plan to add half-diamonds on the sides and plain setting triangles top and bottom which may involve a fabric purchase... oh, well.

I'm also counting down to the end of the year, hoping to balance my stash enhancement with outgoing projects.  Nothing added this week and nothing to count out.

So that's what's on my design wall this Monday morning.  Head over to Patchwork Times to see what the rest of the quilting world is working on.

Wednesday, September 23, 2015

TBT - Shoofly on Steroids

Equal Time

Since I showed Son-2's quilt last week, it's only fair to afford equal time to Son-1 and his wife.  This is possibly the second quilt I ever finished -- the first being a Quilt-in-a-Day Double Pinwheel for GS-3 in 2001.

Shoofly on Steroids
These sampler blocks were part of a shop's Second Saturday Sampler program.  The deal was to buy one Thimbleberries kit for $5 and if you returned with the completed block the next month and watched a new product demo, the next kit was free. These blocks cost me $60!  Not a matter of false advertising; I either didn't get a block finished in time or forgot to go pick up the next one on time.  Lesson learned.

I had just joined a guild and one of the ladies suggested I try hand piecing so I practiced on these blocks -- which partly explains why I was always late in finishing.  But when it came time to setting them I went back to the sewing machine.

For some reason I did not want to do a traditional setting with sashings or plain setting blocks.  So why not complicate things with an original design?  I think I saw an episode about shadow quilts on Simply Quilts and decided to try it.

The blocks were supposed to finish at 10" but because I  hadn't quite conquered an accurate 1/4" seam, I added the frames to make them finish at 12".  The frames also help set them off against the background.  The quilt is about 70" square.

Before I had EQ, I designed the entire thing on graph paper.  (I wish I had saved that!)  When I realized that the light sections of the big shoofly would be very big and uninteresting if they were plain, I decided to put subliminal shooflies in the background.

Looking back on these early quilts I realize that I was a lot freer in my design choices then, not unlike the modern quilters today.  I am working to regain some of that spontaneity.

Linking up with Krista Quilts for Throwback Thursday.